Editorial Solution
First, let's understand the basics of Push Button Switch.
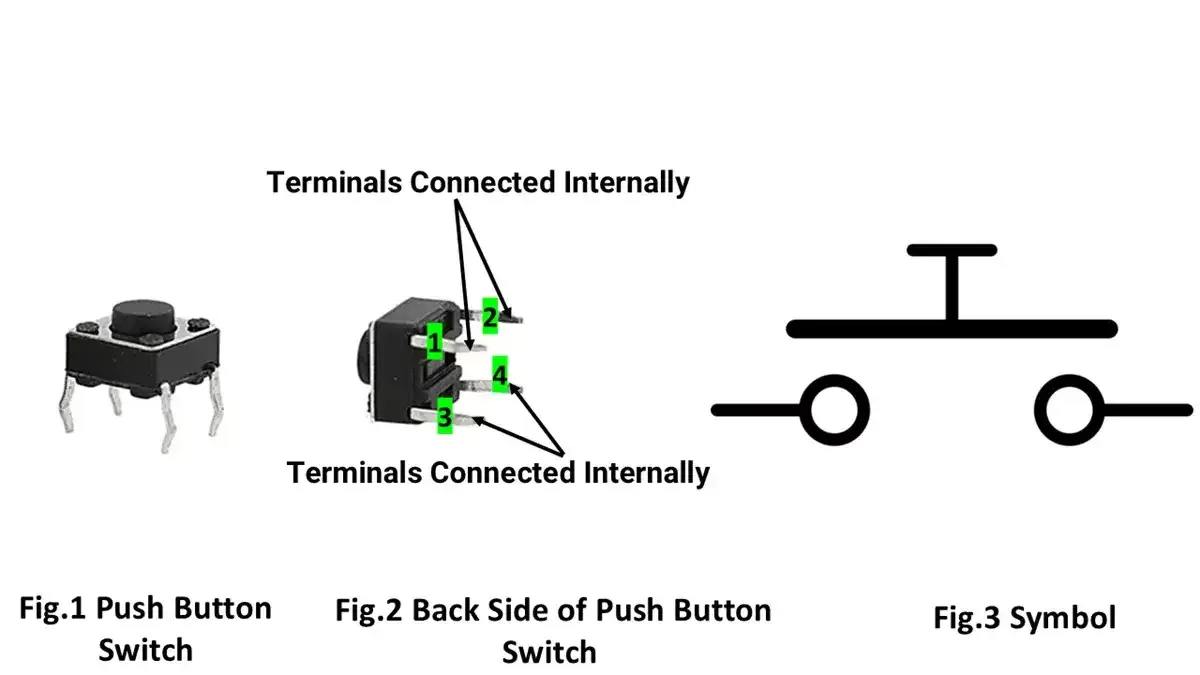
- The push-button switch has four terminals. As shown in Fig. 2, terminals 1 and 2 are internally connected, and terminals 3 and 4 are internally connected. When the switch is pressed, all terminals will be connected.
- When interfacing a push button, it is important to ensure it is connected to a definite voltage level on both the ON and OFF State.
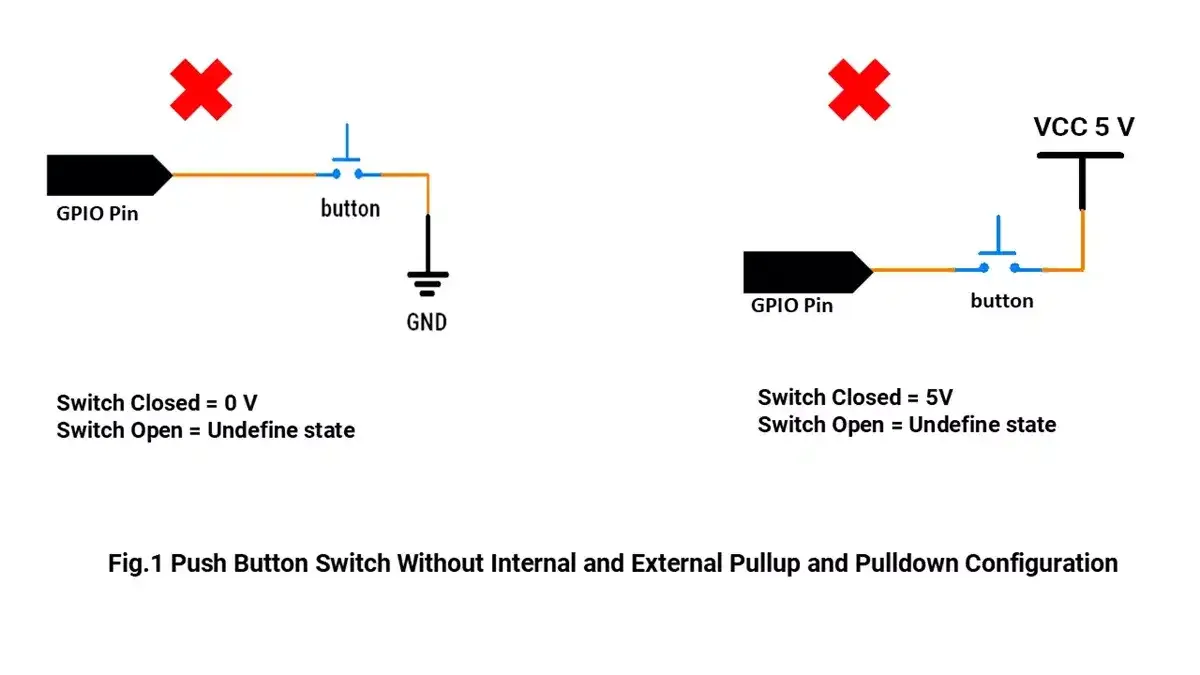
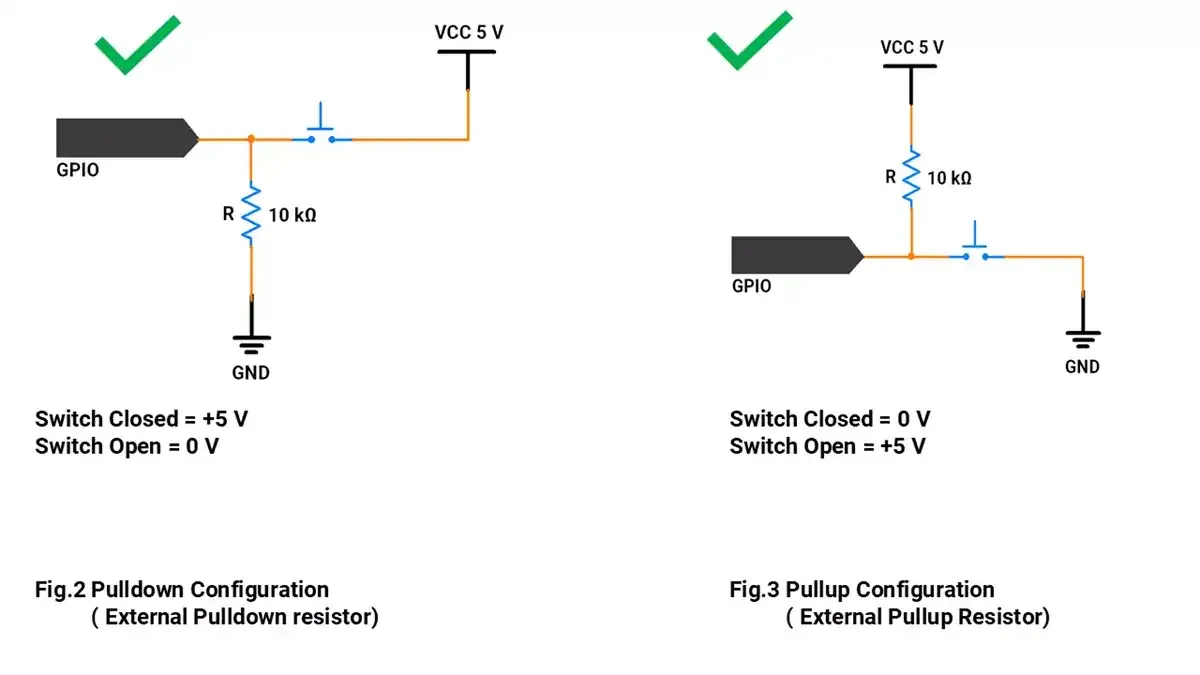
- The configurations in Fig. 1 will not work properly when the switch is not pressed, the GPIO pin has no connection to it, i.e. floating state, which will give us random HIGH & LOW GPIO pin readings.
- So when we connect the push buttons we can use the pull-up or pull-down configuration.
- However, Arduino UNO has an internal PULLUP Resistor, which can be used for the Switch interface.
- To use internal PULLUP, we simply have to configure that GPIO as
pinMode(pin, INPUT_PULLUP);
- While detecting single click, double click, and long press timing and debouncing are very important concepts.
- Debouncing is a phenomenon where the electrical signal fluctuates rapidly between high and low states due to the mechanical contacts inside the switch. This can cause multiple unintended readings for a single press. To avoid this Debouncing hardware and software techniques are used.

- To distinguish between different types of presses (single click, double click, and long press), timing is a crucial parameter:
- Double Click: If the consecutive two-click press is happening in between 400ms time, then we will detect it as a double click. (irrespective of second click press time)
- Long press: If the switch is pressed and held for more than 1 second.
- Single Click: Those clicks, that will not be counted in double and long press, will be single click.
Method 1: Using PULLUP Configuration
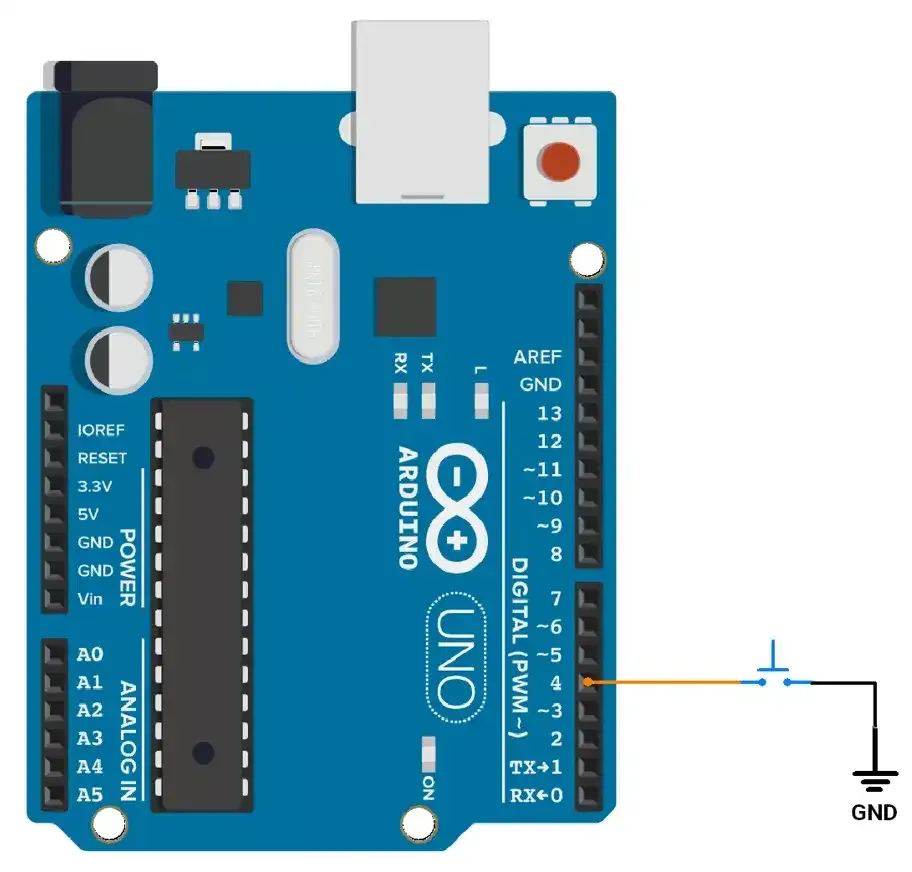
- So let’s connect the push-button switch using a pull-up configuration. We will connect the switch to digital pin 4 of Arduino UNO. It has an internal PULLUP Resistor so we will use it for the Switch interfacing.
Code
const int button_pin = 4;                // Pin connected to the button

unsigned long debounce_duration = 50;   // Minimum time to debounce button (in milliseconds)
int previous_button_state = HIGH;       // Previous state of the button
int current_button_state = HIGH;        // Current state of the button
unsigned long last_debounce_time = 0;   // Time when button state last changed
unsigned long press_start_time;         // Time when button press starts
unsigned long release_time;             // Duration of the button press

void setup() {
  pinMode(button_pin, INPUT_PULLUP);    // Configure button pin with internal pull-up resistor
  Serial.begin(115200);
}

void loop() {

  if (debounced_button_press_check(button_pin, LOW)) {
    press_start_time = millis(); // Record the time the button was pressed
    while (!debounced_button_press_check(button_pin, HIGH));
    release_time = millis() - press_start_time; // Calculate the button release duration

    if (release_time > 1000) {
      Serial.println("Long press detected");
    } else {
      // Check for single or double press within a specific time frame
      while (1) {
        if (debounced_button_press_check(button_pin, LOW)) {
          Serial.println("Double click detected");
          break;
        }
        if ((millis() - press_start_time) > 400) {
          Serial.println("Single click detected");
          break;
        }
      }
    }
  }
}

//Checks for a debounced button press and returns true if detected, false otherwise.
bool debounced_button_press_check(int pin, bool expected_state) {
  int button_reading = digitalRead(pin);

  // If the button state has changed, reset the debounce timer
  if (button_reading != previous_button_state) {
    last_debounce_time = millis();
  }
  previous_button_state = button_reading;

  // If the state has remained stable beyond the debounce duration, consider it valid
  if ((millis() - last_debounce_time) > debounce_duration) {
    if (button_reading != current_button_state) {
      current_button_state = button_reading;
      if (current_button_state == expected_state) {
        return true; // Return true if the desired state is detected
      }
    }
  }
  return false; // Return false if no valid press is detected
}
Let’s Understand the code
- The button is connected to pin 4 with an internal pull-up resistor.
debounced_button_press_check();detects a button press by filtering debouncing and returns true if the button state is stable and matches the expected state for debounce duration else, it returns false.- If pressed, it measures how long the button is held:
- Long press (> 1 sec): Prints "Long press detected."
- Single click or double click: If the consecutive two-click press is happening in between 400ms time, then we will detect it as a double click. (irrespective of second click press time) and printed it as “double click” otherwise, prints "Single click detected."
Method 2: Using PULLDOWN Configuration
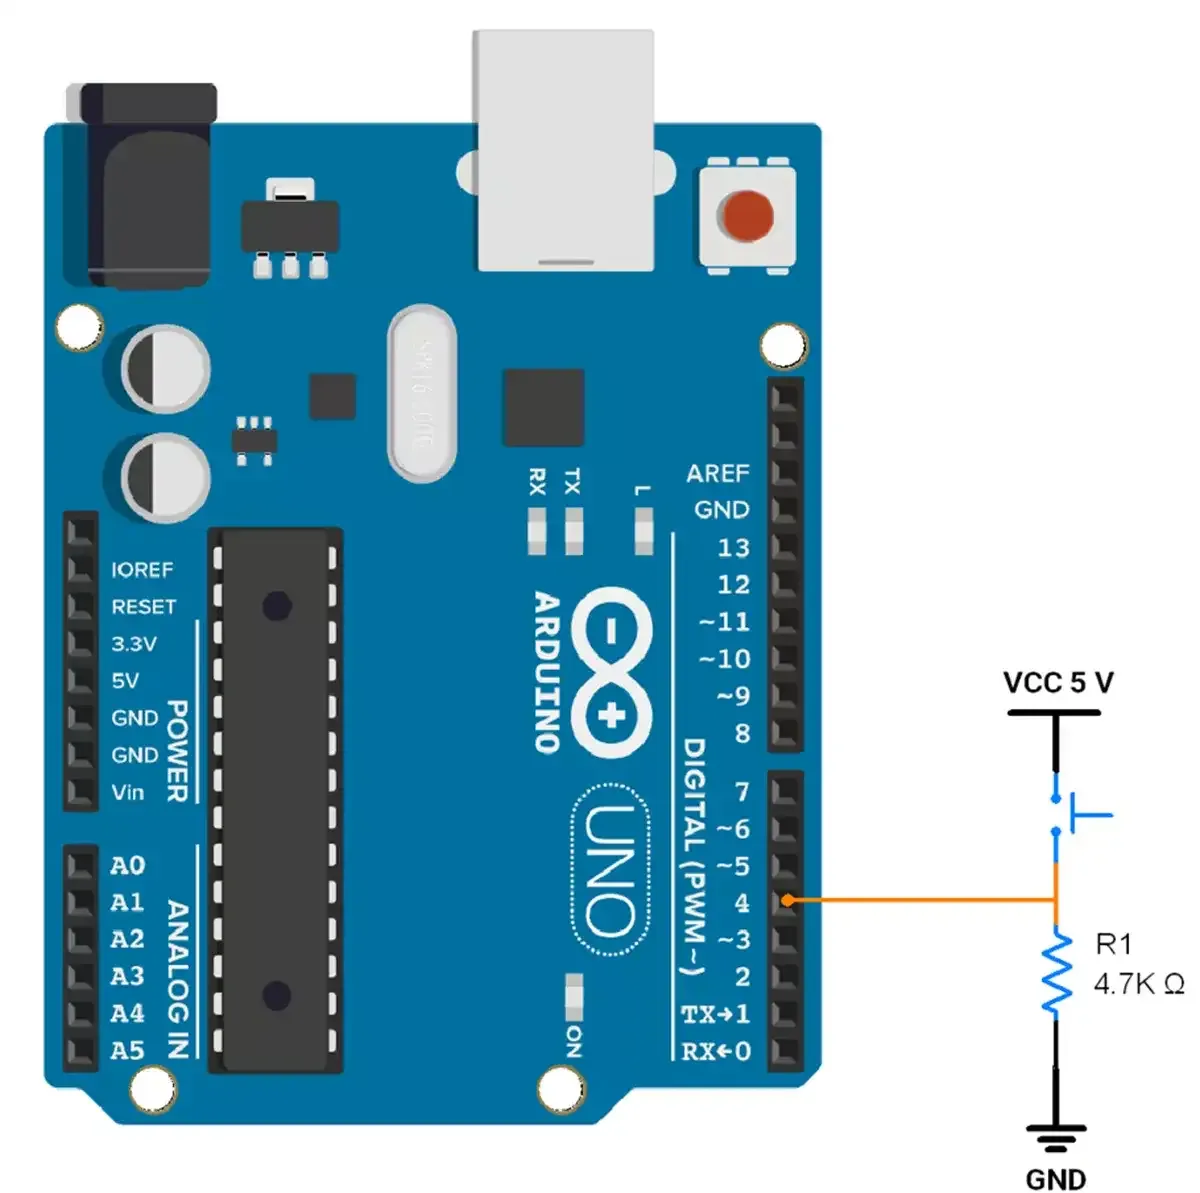
- So let’s connect the push-button switch using a pulldown configuration. We will connect the switch to digital pin 4 of Arduino UNO.
- As Arduino UNO does not have an internal pulldown resistor so we have to use an external pull-down resistor.
- The pull-down resistor is typically between 4.7kΩ and 10kΩ so we will use a 4.7kΩ resistor.
Code
const int button_pin = 4;                   // Pin connected to the button

unsigned long debounce_duration = 50;       // Minimum time to debounce button (in milliseconds)
int previous_button_state = LOW;            // Previous state of the button
int current_button_state = LOW;             // Current state of the button
unsigned long last_debounce_time = 0;       // Time when button state last changed
unsigned long press_start_time;             // Time when button press starts
unsigned long release_time;                 // Duration of the button press

void setup() {
  pinMode(button_pin, INPUT);
  Serial.begin(115200);
}

void loop() {

  if (debounced_button_press_check(button_pin, HIGH)) {
    press_start_time = millis(); // Record the time the button was pressed
    while (!debounced_button_press_check(button_pin, LOW));
    release_time = millis() - press_start_time; // Calculate the release time duration


    if (release_time > 1000) {
      Serial.println("Long press detected.");
    } else {

      // Check for single or double press within a specific time frame
      while (1) {
        if (debounced_button_press_check(button_pin, HIGH)) {
          Serial.println("Double click detected.");
          break;
        }
        if ((millis() - press_start_time) > 400) {
          Serial.println("Single click detected");
          break;
        }
      }
    }
  }
}

//Checks for a debounced button press and returns true if detected, false otherwise.
bool debounced_button_press_check(int pin, bool expected_state) {
  int button_reading = digitalRead(pin); // Read the current state of the button

  // If the button state has changed, reset the debounce timer
  if (button_reading != previous_button_state) {
    last_debounce_time = millis();
  }
  previous_button_state = button_reading;

  // If the state has remained stable beyond the debounce duration, consider it valid
  if ((millis() - last_debounce_time) > debounce_duration) {
    if (button_reading != current_button_state) {
      current_button_state = button_reading;
      if (current_button_state == expected_state) {
        return true; // Return true if the desired state is detected
      }
    }
  }
  return false; // Return false if no valid press is detected
}
Let’s Understand the code
- The code is the same as above (Pullup configuration), only LOGIC levels are reversed.
OUTPUT
- Switch interfacing hardware connection (Using internal pullup)
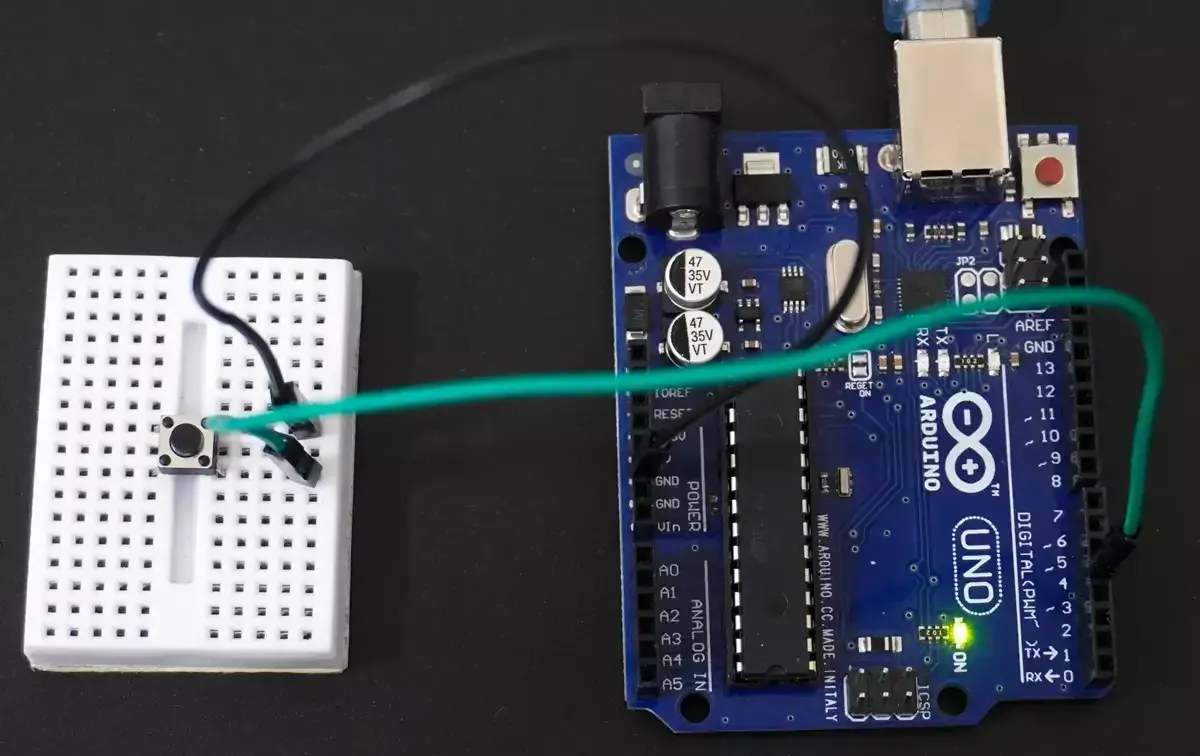
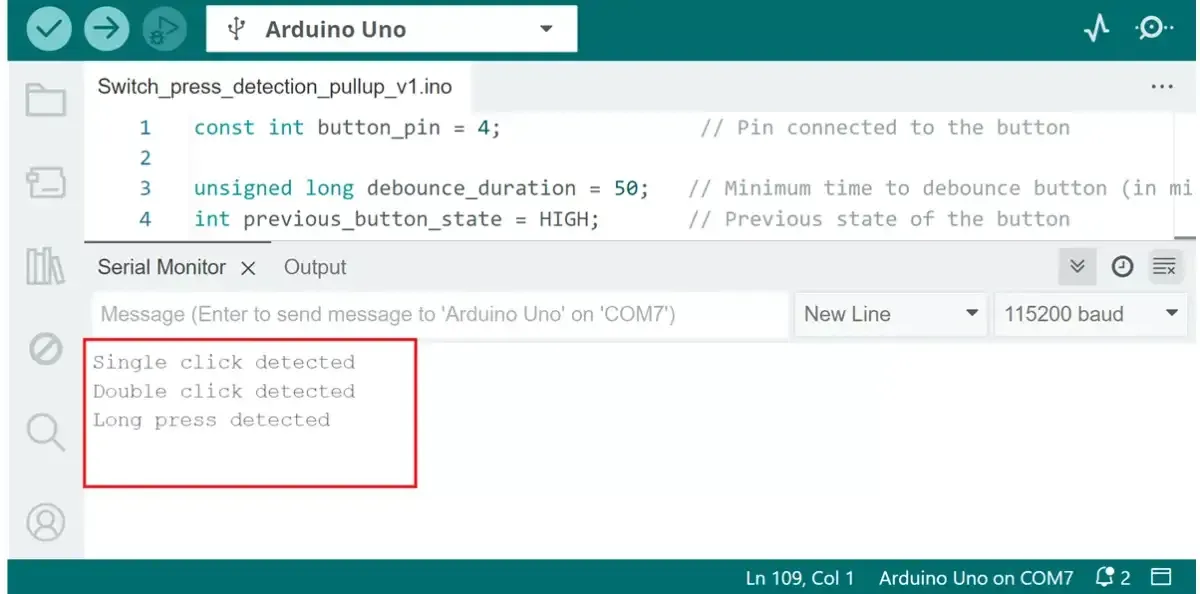
- Single click, double click, and long press printed on serial monitor.
